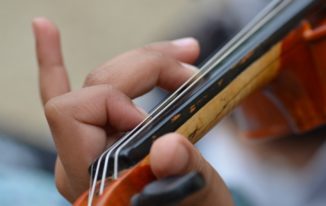
First position on the violin
First and foremost, I want you to understand that this will be called First Position. Simply log this away in your brain. If you’re like me and you research everything about everything you want to do, you’ve probably come across people sliding up and down the neck of the violin. Don’t worry about that just yet. We will cross that bridge soon enough. For now, let’s lay down the foundations for that with first position. This simply means that your first finger is next to the nut of the violin.
Now that we’ve established the basics of holding the bow and the mechanics behind bowing, it’s time to deal with your fingering hand! If you’re a right handed player, like the vast majority of the violin world, the hand you will using for this is your left hand. If you’re a left handed player, it will be your right hand. But before we actually place our fingers down on the strings, let’s go over some basic tips.
It’s all about the tips of the fingers
 Yeah I sort of walked you right into that one. Playing with your fingers on the violin is the way we make nearly all of our notes. The only four notes that do not require fingers are the open strings G, D, A, E. This means that we change the pitch of the strings by placing our fingers further and further up the neck. I wont go too much further in depth with the theory aspect of this because we have already discussed it in an article here.
In order to do this most effectively and prepare ourselves for proficiency with more advanced techniques in the future, we want to play and make notes on the tips of our fingers. In other words, your fingernails will be either perpendicular to the fingerboard, or slightly tilted towards your fingering hand.
Location, Location, Location
The next thing we want to address is exactly where we place our fingers on the fingerboard. I have to give you a disclaimer: these notes and their location are the first notes I teach beginners. In other words, there will be other notes, and other places to put your fingers in the future. For now, focus on these 4 locations for your fingers.
In addition to this, I want to make it supremely easy for you to find the locations for your fingers. I’ve found a wonderful product that helps with this. It is easy to install and is color coded so that you can easily see where to place your fingers. The product is called the “Don’t Fret” finger locator system. You can find this on Amazon and other vendors online. Additionally, when you purchase the product, make sure that you purchase one that exactly fits the size of the violin you are using. For example, if your violin is 1/2 size, purchase a 1/2 size Don’t Fret system. If it is 4/4 size, purchase a 4/4 size Don’t Fret system.
The Don’t Fret system comes in a couple of variations. One is a sticker, so it works by having adhesive on the back side that sticks to the fingerboard. This is the version of the system that I like the best as it stays relatively low to the fingerboard which keeps it from causing pitch variations with the strings.
The second is a thicker plastic version that has something akin to “wings” that wrap around from the front to the back of the neck and stick to themselves by virtue of the fact that the material adheres to itself. It does not use adhesive at all. I personally do not like this version. My advice is to get the aforementioned version that works like a sticker that you place on the fingerboard.
Color coded: Demystifying violin finger locations
 The Don’t Fret system uses color coded stripes on your violin fingerboard in order to show you where to place your fingers. I absolutely love this. It’s simple, it’s fun, and you can make games out of it for younger students. Here’s the correlation between your fingers and your tapes in first position:
- Yellow Tape=1st Finger
- Red Tape=2nd Finger
- Blue Tape=3rd Finger
- Orange(ish) Tape=4th Finger
Final thoughts
TIP: Don’t start using your fourth finger just yet. Practice just placing your fingers down on your first three tapes and then graduate onto the fourth once you feel comfortable with the exercises I will be giving you. To become truly comfortable with this will require some time and effort, so settle in for the long haul.
Use the pictures provided to help you understand where your fingers go and exactly how to hold your fingers. The video will help demonstrate the process as well. Following this, you will be working on some exercises that will help you become fluent and fluid with your finger placement. Don’t try bowing the fingers for the first 3 days. I only want you to pizzicato your fingers. Once you’ve gotten comfortable with this, then add bowing.
So practice this lesson, head on over to the next article, and prepare for more fun!
