Why don’t we use all the strings?
This is because initially, it can be tricky making all the strings ring with all the necessary fingers on the fingerboard, having just picked up the guitar. Trust me, it gets a lot easier, but we first need to learn the mechanics of making a chord.
 What are these mechanics you speak of?
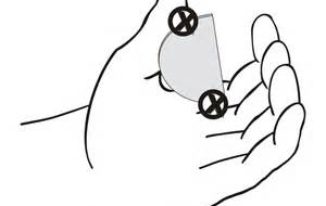
What I mean when I say “mechanics” in this sense is posture and technique. As a rule of thumb, always press your fingers down on their tips, directly next to the frets, but never on top of the frets. There’s a reason for this.
On the guitar, the frets stop the strings at that specific point, so if your finger is on top of the fret, the string will be dampened slightly. Also, it’s important to keep your wrist angled down and not up when playing the guitar. There are only few times we want the palm to be flat on the back of the neck of the guitar (which is what a wrist bent upward produces).
Some tips on memorizing the chord shapes
When learning your new chords I teach all of my students a technique, or more of a habit, that helps you memorize the shapes you’re learning. First, don’t simply make the chords and then strum away. While it’s very satisfying to hear yourself making the chord, it doesn’t help you functionally. In other words, if you needed to make that chord quickly, simply holding the chord and strumming it won’t help your speed and accuracy in making a chord on the fly. And so, I tell my students to make the chord, strum it once, then remove your hand and either shake it, or slap your knee with an open palm with the hand you used to make the chord.
Another tip is to make the chord with your fretting hand, then slowly play each individual string involved in the chord. This way, you can be sure that each string is ringing clearly, and isn’t being muted. This is important because you may be strumming, but certain strings can ring so loudly that you can’t hear others that are being muted. Each string is important in every chord you are making.
Three String C Chord
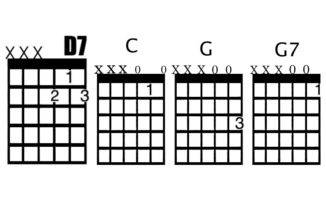
 This is the first chord we normally learn. Take your index finger (1st) finger and place it on the first fret of the second string B. Next, you’re going to strum the 1st string high E, the 2nd string B, and the 3rd string G together. This is the three string C chord! Remember all previous tips on posture and technique, and then use the memorization tips to make it yours. For the chart provided, look only at the C Major, and the three strings on the right hand side of the C Major diagram.
The Three String G7
The next chord we learn is the three string G7 chord. Take your index (1st) finger and place it on the first fret of the 1st string high E. Then, strum the 1st string high E, the 2nd string B, and the 3rd string G. This is the three string G7 chord.
The Three String G
The next chord we learn is the three string G chord. Take your third finger and place it on the third fret of the 1st string high E. Next, strum the 1st string high E, the 2nd string B, and the 3rd string G. There you go!
The Three String D7
This is the 4th chord I normally teach. This involves the most fingers. Take your 1st (index) finger and place it on the first fret of the B string. Next, take your 3rd finger and place it on the 2nd fret of the 1st string high E. Then, take your 2nd finger and place it on the 2nd fret of the 3rd string G. Now, strum the 1st string high E, the 2nd string B, and the third string G.
Final thoughts
Congratulations on learning your first four chords! As a general rule, I have my students strum down. In other words, from thickest (lowest) string to thinnest (highest) string. I teach alternate (down, up). strumming after we get the hang of down pick strumming. Also, remember that when down strumming, you want to place your fingers first on the lowest strings, then the highest strings. Why? Because strumming down, we hit the lowest strings first.
Now, remember your technique and posture, and use your memorization tips to your advantage and you’ll be swiftly changing chords and strumming along in no time. Keep practicing and we’ll see you in the next article!
